Removing
Attention: During removal and installation, do not subject the steering column to impacts in the axial direction.
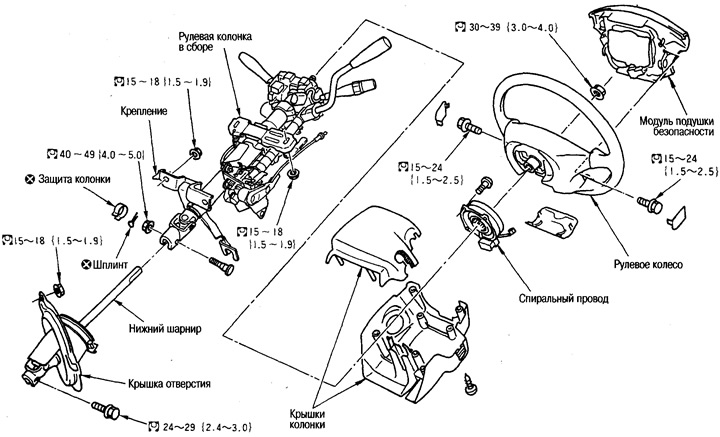
1. Remove the steering wheel and steering column covers, see above.
2. Remove the lower section of the dashboard from the driver's side.
3. Remove the coiled wire, see chap. Additional passive safety system.
4. Remove the column guard over the bottom pivot and the cotter pin. Loosen the fixing bolt and nut.
5. Remove the ignition lock cable from the steering column assembly. See ch. Automatic transmission.
6. Remove the clamp and wiring connector from the steering column assembly.
7. Turn off fixing nuts of a steering column in gathering and remove it.
Attention:
- Use the mount to fix the position of the steering column.
- When removing and installing the steering column assembly, be careful not to deform its bottom bracket.
Installation
Installation should be carried out with the steering column lock open.
1. Install the steering column assembly, hand-tighten its fixing nuts over the lower pivot.
2. Install the temporary steering column mount and tighten the nuts in the following order: bottom right, bottom left, top right, top left.
3. Install column guard over bottom pivot and cotter pin. Tighten the mounting bolt and nut.
Caution: Do not reuse guard and cotter pin.
4. Install all clamps and wiring connectors.
5. Install the ignition lock cable to the steering column assembly. See ch. Automatic transmission.
6. Install the coiled wire, see chap. Additional passive safety system.
7. Install the lower section of the dashboard on the driver's side.
8. Install the steering wheel and steering column covers.
Attention: After installation, turn the steering wheel. Make sure it rotates smoothly, without sticking, making strange noises or applying excessive force.