Cleaning
1. Remove all attachments and sensors from the cylinder block. For cleaning, you also need to get the plugs. To do this, drill a small hole in the plugs, into which screw a self-tapping screw. The plugs are removed with pliers behind the screw heads, or with an impact puller.
2. Scrape off any remaining gasket material from the cylinder block and from the main bearing cap frame (in those engines in which the frame is provided), being careful not to damage the split sealing surfaces.
3. Remove all oil channel plugs (if provided). These plugs have a very tight fit and may need to be drilled out and reamed through. When assembling the engine, replace all plugs.
4. If the surface of the cylinder block is heavily soiled, steam cleaning will be required.
5. After steaming the block, repeat the cleaning of the lubrication holes and channels. Flush all internal channels of the cylinder block with warm water until clean water flows out. Dry the unit thoroughly and coat all split and ground surfaces with light oil to prevent rust. The drying process can be accelerated by blowing out the internal channels with compressed air.
6. If the surface of the cylinder block is moderately dirty, then you can limit yourself to washing the cylinder block with a stiff brush and hot water (with a temperature that excludes burns) with soap or detergent. Take the time and thoroughly flush the cylinder block. Regardless of the cleaning method, rinse all internal lubrication channels very thoroughly and dry thoroughly. Lubricate the cylinder walls with oil to prevent rust.
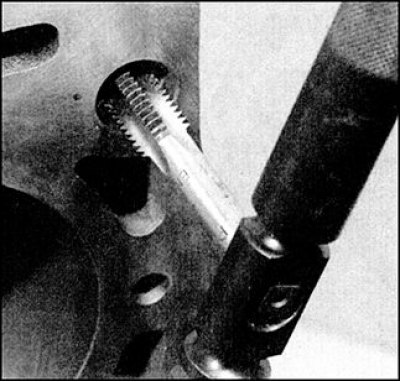
7. The threaded holes in the block should be cleaned to ensure accurate torque readings during reassembly. Drive the threads with a tap, as this will clean the threaded holes of dirt, corrosion and sealant residues, as well as restore the threads. If possible, blow out holes with compressed air to remove material residue from the tap.
Attention! Good results are obtained by injecting high pressure water-dispersion lubricants into the holes, which are commercially available in long aerosol cans. Wear protective goggles when cleaning in this way.
8. Install new plugs in the cylinder block, after lubricating them with a suitable sealant.
9. If engine assembly is delayed, cover the cylinder block with plastic wrap to prevent dirt and rust from entering. Lubricate all split sealing surfaces to prevent corrosion.
Status check
1. Visually inspect the cylinder block for cracks and corrosion. Check the condition of the threads in the holes, mark the places with stripped threads. If there were suspicions of a coolant leak inside the cylinder block, then the block must be tested for leaks, for which it is advisable to contact a specialist. If defects are found, repair the unit (if possible), or replace.
2. Check for chips and burrs on the inner surfaces of the cylinders. Check the presence of a shoulder in the upper part of the cylinder, the shoulder indicates increased wear on the cylinder.
3. Check for chips and burrs on the inner surfaces of the cylinders.
4. Measure the inside diameter of the cylinder 10 mm from the edge of the cylinder, parallel and perpendicular to the engine axis. Repeat measurements at distances of 60 and 100 mm from the edge of the cylinder. Based on these six measurements, determine the taper and ovality of the cylinder.
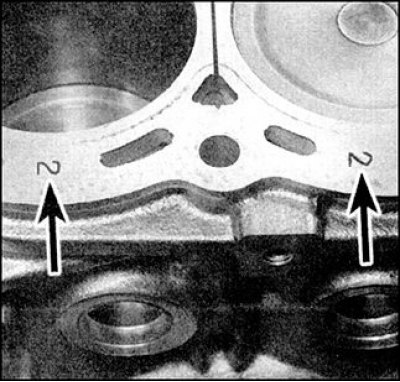
5. Designations of dimensional groups of cylinders (indicated by arrows) stamped on the split plane of the block under the cylinder head gasket, next to the cylinders.
6. Check the condition of the pistons and rings (see subsection 3.2.2.12). The clearance between the piston and the cylinder is defined as the difference between the measured diameters of the cylinder and the piston.
7. Compare the results with those given in (see subsection 3.2.1.1). If any of the measured values is outside the standard limits, then the cylinder must be bored to the next repair diameter, and if this is not possible, then the cylinder block should be replaced. To take the most correct further action, consult a specialist. Spare parts are supplied with pistons of only one repair size - 0.2 mm.
8. If the condition of the pistons and cylinders is satisfactory, and the wear is such that the clearance between the piston and cylinder is within the normal range, then only the replacement of the piston rings will be necessary.
9. In this case, the cylinders are only honed, which ensures better running-in of the piston rings and their tight fit to the cylinder walls.
10. Honing is usually done with a honing head with spring-loaded stones, which is inserted into an electric drill. It is also necessary to prepare kerosene or honing oil and rags. While honing, periodically move the tool up and down in the cylinder, generously lubricating the cylinder walls.
11. After honing, a structure of fine lines should form on the surface of the cylinder walls, intersecting at an angle of about 60°. Do not remove excess material, finish honing immediately after finishing the surface. If new pistons are to be installed, it should be borne in mind that the piston manufacturer may recommend machining the cylinder walls with a slightly different line intersection angle. In this case, follow the piston manufacturer's instructions.
12. Do not remove the honing head from the cylinder during rotation - first wait until it comes to a complete stop. At the end, carefully wipe the cylinder of oil. If you do not have a honing tool, or if you are not sure that you can do this operation well, you should go to a workshop where the cylinders will be honed for a moderate fee.