Attention! If the engine has been overheating frequently, it is likely that the cylinder head may have warped, carefully check for signs of head deformation.
Cleaning
1. Remove all remnants of gasket material from the split surfaces of the block head with cylinder block, intake and exhaust manifolds.
2. Scrape off the carbon deposits from the combustion chambers, clean all holes and channels of carbon deposits, then flush the cylinder head with solvent.
3. Scrape off massive deposits of carbon from all areas of the valves, using a motorized brush, remove carbon from the valve heads and stems.
Examination
Attention! Before concluding that parts need to be resurfaced in the workshop, be sure to perform all the verification procedures described below. Make a list of things that need special attention.
Cylinder head
1. Carefully inspect the head, check for cracks, traces of coolant penetration and other damage. If cracks are found, replace the cylinder head.

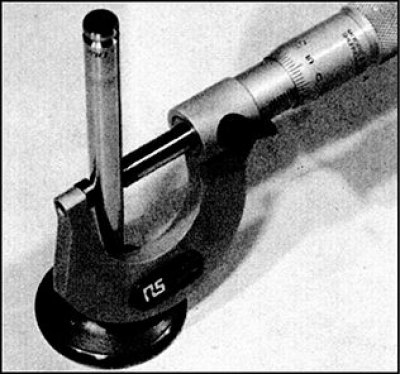
2. Check the deviation of the split surface of the cylinder head from the plane using a feeler gauge and a calibration bar. If a curvature of the split plane is found, then the head must be ground. If the deformation of the split plane is such that the height of the head after grinding becomes less than specified in subsection 3.2.1.1, then replace the head.
3. Check the condition of the valve seats in each combustion chamber. In the presence of pitting (fossae), cracks, traces of burnout, head repair will be required in a car service workshop. Minor defects can be removed by lapping the valve to the seat on a finely dispersed composition.
4. Check guide bushings for wear. To do this, insert the valve into the corresponding guide sleeve and shake it from side to side. A small, barely perceptible play is acceptable. If there is significant valve play in the sleeve, then measure the valve diameter. If the valve diameter has noticeably decreased due to wear, replace the valve. If the valve stem diameter is correct, replace the guide bushing. This work is best done in a car service workshop, or entrusted to a qualified mechanic.
5. If the guide bushings are to be changed, the valve seats must be reground (or ream) only after pressing in new bushings.
Valves
6. Carefully inspect each valve head for cracks, wear, and burn marks. Check the valve stems for burrs and wear ribs. Turn the valve to check for bending. Check the wear at the ends of the valve stems. If any signs of wear or damage are found, replace the valve.
7. If as a result of this check it turns out that the condition of the valve is satisfactory, then measure the diameter of the valve in several places. A noticeable difference in diameter indicates valve stem wear. If a noticeable difference in diameters is found in at least two places, the valve (or valves) replace.
8. If the condition of the valves is satisfactory, then they should be lapped to the seats to ensure tight contact, excluding gas breakthrough. If the saddles have only minor damage, or the seat has been re-grinded, then lapping can be done on a finely dispersed abrasive composition. A coarse lapping compound should be used only if traces of deep wear or severe burnout of the seats are found. In this case, the cylinder head and valves should be checked by an experienced technician to determine whether the seats need to be re-sinked, or even the seat liners replaced (if provided).
9. Lapping of valves is performed as follows. Place the cylinder head on a flat surface with the combustion chambers facing up.
10. Apply a thin layer of lapping paste to the bevel of the seat (appropriate dispersion) and press the suction cup of the valve lapping tool against the valve head.
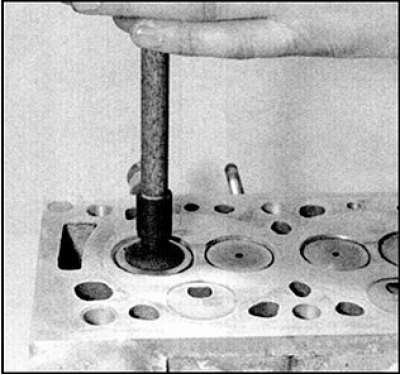
11. Lapping is carried out by turning the tool 180°in both directions. While lapping, occasionally lift the valve to evenly redistribute the abrasive. Lapping is greatly facilitated if a not very stiff spring is placed under the valve head.
12. Lapping on a coarse abrasive composition should be completed after the formation of a monotonous matte belt on the chamfers of the valve and seat, then wipe the valve and seat from paste residue and continue lapping on a fine composition. Lapping is considered complete when a uniform, continuous grayish band forms on the chamfers of the valve and seat. Further lapping is not allowed, as due to excessive wear of the seat, its subsequent repair may become impossible.
13. After all valves have been lapped, remove abrasive residue by thoroughly washing all parts with kerosene or thinner.
Valve train parts
14. Check the springs for signs of chipping and damage. The manufacturer recommends testing valve springs by measuring the force that causes the spring to be compressed to a certain length. This technique is possible only with the use of special equipment. Therefore, checking the springs should be carried out at the dealer's car service. A rough check of the condition of the spring can be made by comparing the free length of the spring with that specified in subsection 3.2.1.1.
15. Place each spring on a flat surface and place a square next to it. Measure the distance between the coil of the spring and the square in the upper part and compare with the value indicated in subsection 3.2.1.1.
16. If at least one of the springs is damaged, has an increased deviation from the vertical, or has lost elasticity, then replace all the springs in the set. In general, when overhauling valve springs, it is recommended to change regardless of their condition.
17. Oil seals change regardless of their condition.