Note. A description of the removal and installation of the exhaust manifold, catalytic converter and lambda probe No. 1 is given in Section Removal and installation of the exhaust manifold, catalytic converter and lambda probe.
Exhaust system components
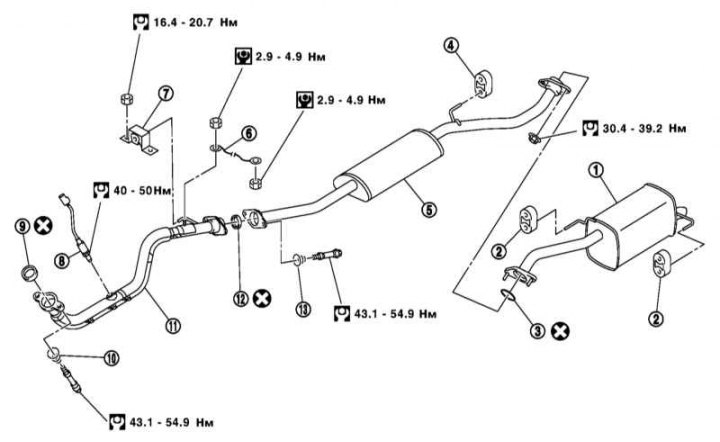
1 - Main muffler; 2, 4 - Rubber hangers; 3 - Gasket; 5 - Central muffler; 6 - Ground wire; 7 - Bracket; 8 - Postcatalytic lambda probe; 9, 12 - Seal; 10, 13 - Spring; 11 - Front section of the exhaust pipe
Removing
1. Jack up the car and put it on stands.
2. Remove the crankcase protection and treat all bolts and nuts of the exhaust system with a rust dissolving agent. Wait a while.
3. Give connecting fixture of sections of system of release OG and remove them from rubber suspensions.
4. Disconnect the lambda probe wiring connector and turn it out with a special key.
5. Remove a connecting wire of weight.
Installation
Attention! Always replace seals, nuts and bolts with new ones. To facilitate subsequent disassembly, it is recommended to cover the nuts and bolts of the exhaust system with high-temperature paste. Visually check the rubber suspensions and replace them if necessary.
1. If the pipes of the exhaust system are not being replaced, clean their mating surfaces with sandpaper from carbon deposits and sealant residues before assembling.
2. Connect electrical wiring.
3. Connect sections of system of release OG and tighten their coupling fixture by hand.
4. Secure the exhaust pipe to the body with brackets and rubber hangers.
5. Center the tie bolt springs over the hole in the flanges and tighten the tie bolts and other fasteners.
6. Expose the exhaust system so that it is located on the hangers without tension. At the same time, make sure that there is sufficient clearance between it and the bottom.
7. Check the tightness of the exhaust system (see chapter Vehicle settings and routine maintenance).