


Cylinder Head Cover Installation Components
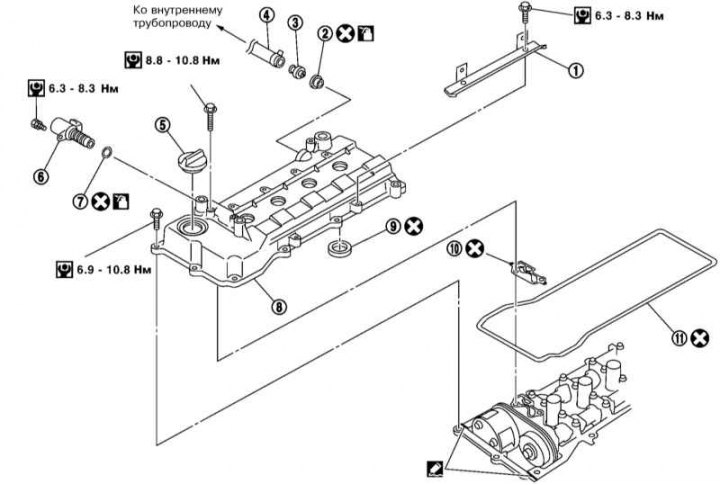
1 - Electrical wiring mounting bracket; 2 - Rubber bushing; 3 - PCV check valve; 4 - PCV hose; 5 - Oil filler cap; 6 - Solenoid valve for controlling the phases of the intake valves; 7 - Sealing ring; 8 - Cylinder head cover; 9 - Cylinder head cover sealing ring; 10, 11 - Gasket
1. Remove the air intake sleeve and air cleaner cover assembly (see section Removal and installation air intake tract components).
2. Remove the right engine mount stand (see section Removal and installation of the power unit).
Note: There is no need to jack up the engine.
3. Remove the ignition coils (see section Replacing spark plugs) and a bracket for fastening their electrical wiring.
4. Disconnect the PCV hose and disconnect the intake valve timing solenoid wiring connectors.
5. If necessary, remove the PCV check valve and intake valve timing solenoid.
Note: Handle the electronic valve carefully, do not disassemble it.
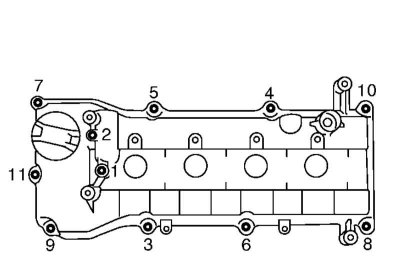
6. Loosen the cylinder head cover mounting bolts in the following sequence:, reverse shown in the illustration and remove the cover.
Note: Position the removal bolts so that you can reinstall them in their original locations.
7. Carefully, trying not to damage the cylinder head cover, remove its seals using a screwdriver.
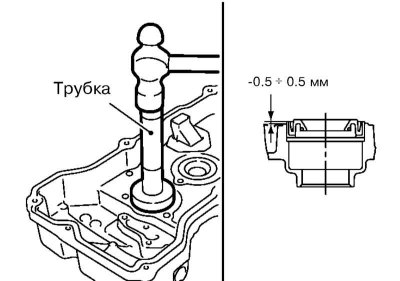
8. Install new sealing rings by pressing them into the cover using a tube with an outer diameter 97 mm and internal diameter from 83 to 88 mm.
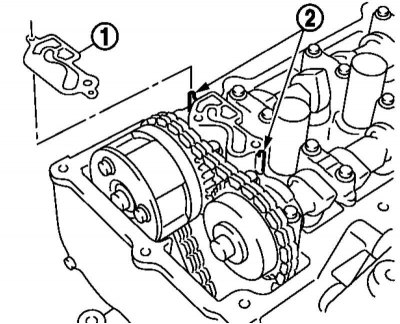
9. Install the gasket (1) on the upper surface of the upper support No.1 of the camshafts, align the centering pins (2) with the holes in the gasket in accordance with the shape of the camshaft support. Install the gasket on the installation gasket of the cylinder head cover.
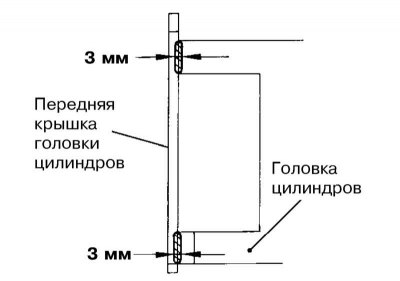
10. Apply sealant to the surfaces shown in the illustration.
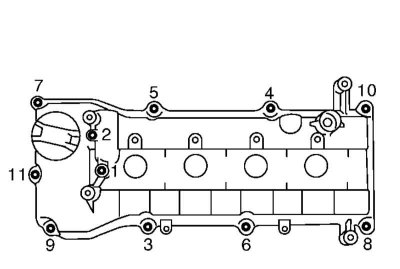
11. Tighten the cylinder head cover bolts evenly in the sequence shown in the illustration. The bolts are of different lengths: No.1 and No.2 are 45 mm, and the rest are 20 mm.
12. Install the intake valve timing control solenoid, making sure that its sealing ring and mating surfaces are clean.
13. Install the PCV check valve and other removed components.