Note. The removal and installation of the top section of the oil pan requires the removal and installation of the transmission.
Components for fastening the oil pan and oil intake
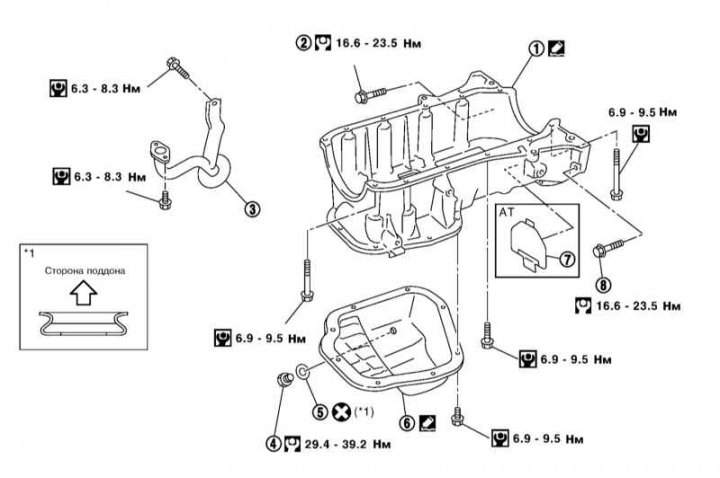
1 - Upper section of the oil pan; 2, 8 - Transmission connecting bolt; 3 - Oil intake; 4 - Drain plug; 5 - Sealing washer; 6 - Lower section of the oil pan; 7 - Back plate cover
1. Remove the locker of the right front wheel arch. Drain engine oil (see chapter Vehicle settings and routine maintenance).

2. Remove the bottom section of the oil pan. To do this, unscrew the fixing screws in the reverse order shown in the illustration and separate the bottom section of the pallet from the top section. If necessary, carefully cut through the sealant with a blade or tap the pan with a soft-faced hammer.
3. Remove the engine oil level dipstick from the guide and remove the accessory drive belts (see Section Replacing accessory drive belts and intermediate belt rollers).
4. Remove the A/C compressor
5. Remove the K / V compressor without disconnecting the tubes from it, take the compressor to the side and fix it with a rope on the body elements so that the tubes are not loaded.
6. Remove the front section of the exhaust pipe (see chapter Power supply and exhaust systems) and catalytic converter bracket (see Section Removal and installation of the exhaust manifold, catalytic converter and lambda probe).
7. Remove the transmission (see chapter Manual gearbox and clutch or automatic transmission).
8. On models with АТ turn out connecting bolts of the top section of the pallet crankcase and АТ.
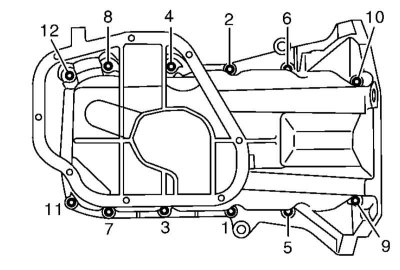
9. Turn out fixing bolts of the top section of the pallet of a case in sequence, reverse indicated in the illustration.
Note. Arrange the bolts so that they are screwed into the original holes during installation - the bolts have different lengths.
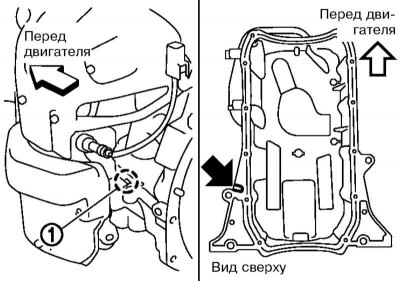
10. Insert a flat-bladed screwdriver into the cutout (1) and separate the upper section of the oil pan from the cylinder block. If necessary, carefully cut through the sealant with a blade or tap the pan with a soft-faced hammer.
11. If necessary, replace the oil pickup. Replace All removed sealing rings and gaskets with new ones.
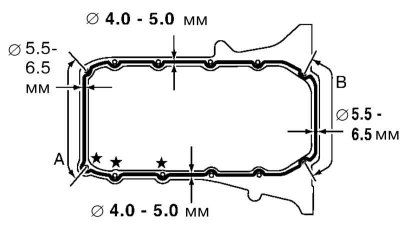
12. Apply a bead of sealant to the cylinder block mating surface of the top section of the oil pan. The diameter and places of application of the roller relative to the holes are indicated by illustrations (Asterisks indicate holes where sealant should be applied from the outside).

13. Tighten bolts of fastening of the top section of the pallet crankcase in the sequence specified in an illustration. Do not confuse the bolts, they have different lengths: Nos. 4, 8, 12 are 70 mm long, bolts Nos. 9 and 11 are 90 mm long, and the rest are 25 mm long.
14. On models with АТ tighten connecting bolts. Install transmission.
15. Apply a bead of sealant to the mating surface of the bottom section of the oil pan. The diameter and places of application of the roller relative to the holes are indicated in the illustration.
16. Tighten bolts of fastening of the bottom section of the pallet crankcase in the sequence specified in an illustration.
17. If not installed, install the oil pan drain plug with a new sealing washer. The installation position of the washer is indicated in the callout *1 in the illustrationComponents for fastening the oil pan and oil intake.
18. Further installation is carried out in the reverse order of dismantling the components.
19. Wait at least 30 minutes after installation and fill the engine with oil (see chapter Vehicle settings and routine maintenance).
20. Start the engine and check for engine oil leaks.