Dismantling
Attention! The engine can be dismantled from the car only as part of the power unit (those. complete with transmission). The power unit is lowered and gets out from under the car. In order to freely get the engine in this way, the car must be raised to a height of at least 75 cm (floor to front bumper) and place on stands.
1. Park the vehicle on a firm, level surface. Block the rear wheels, apply the handbrake. Raise the front of the car and place on stands.
2. Remove the front wheels.
3. Loosen the screws and remove all motor shields.
4. Remove the hood (see subsection 13.7).
5. Drain the coolant.
6. Drain the oil from the gearbox, wrap and tighten both plugs.
7. Drain the oil and remove the oil filter, clean and tighten the drain plug.
8. Remove the battery.
9. Remove expansion tank with bracket.
10. Remove the straps.
11. Remove the generator.
12. On vehicles equipped with air conditioning, remove the compressor bolts, move the compressor aside and secure. Do not disconnect air conditioning hoses.
13. Remove the power steering pump (see subsection 12.15).
14. Remove the brake calipers, set aside and secure without disconnecting the hoses.
15. Disconnect the CV joints from the hubs.
16. Disconnect half shafts (see subsection 10.2).
17. Disconnect the gear selection cable.

18. Remove the spar.
19. Disconnect the muffler intake pipe.
20. Remove the radiator with hoses and fans.
21. Disconnect the anti-roll bar (see subsection 12.6).
22. On carbureted engines, remove or disconnect the following parts and assemblies:
- air filter;
- fuel hoses;
- throttle cable;
- carburetor wires;
- vacuum booster hose, cooling systems and other sensor and valve hoses;
- suction manifold rack;
- exhaust sensor connector.
23. On injection engines, do the following:
- remove the air filter duct;
- perform measures to decompress the fuel system, disconnect the fuel hoses from the throttle body;
- disconnect the throttle cable;
- disconnect wiring connectors;
- move the wiring away from the engine.
24. Disconnect all hoses from the suction manifold.
25. Remove the intake manifold stand.
26. Apply identification marks and disconnect the heater hoses and cooling system hoses from the engine.
27. Disconnect the wiring connectors from the ignition distributor, ignition coil and transistor power supply. Release the wiring sleeve from the clips on the cylinder head and take it to the side. Turn away bolts and remove all wires of connection with weight on a head of cylinders and on a soaking-up manifold.
28. Disconnect the speedometer cable and wires from the gearbox.
29. Fasten the hoist hoist to the cylinder head lugs, tension the hoist so that it takes the weight of the power unit.

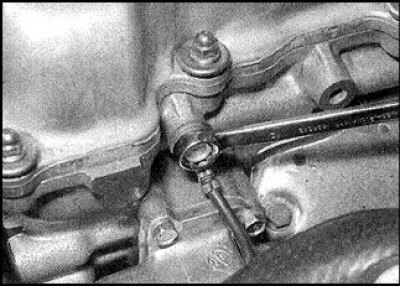
30. Mark the position of the pinch bolt (indicated by an arrow) on the front support bracket of the power unit, unscrew the nut of the coupling bolt and remove the bolt.
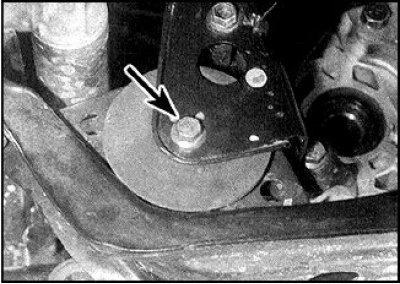
31. Unscrew the nut and remove the rear support pinch bolt (indicated by an arrow). Remove the front support and bracket.
32. Remove the right support and rubber pads.
33. Remove the left support and rubber pads.
34. Make sure that all parts, wires and hoses that may interfere with dismantling are disconnected, removed and laid aside.
35. Roll a cart under the engine and carefully lower the power package. It is advisable to carry out this operation with an assistant, since it will be necessary to tilt the engine slightly so as not to touch the body.
36. Roll the power unit out from under the car.
Removing the transmission from the engine
1. Fix the removed power unit with wooden blocks, placing it on a flat area.
2. Remove the starter.
3. Remove the sump cover and unscrew the first available torque converter bolt, then turning the crankshaft, unscrew the remaining 3 bolts one by one.
4. Secure the torque converter with a piece of metal strip, bolting the strip to one of the starter mounting holes.
5. Loosen the bolts securing the transmission housing to the engine, marking their location.
6. Carefully remove the transmission.
Installation
1. If the gearbox was removed from the engine, then perform the operations described below in paragraphs 1–6. If the checkpoint was not removed, then be guided item 7 and so on.
2. Measure the distance from the holes for the torque converter mounting bolts to the split plane of the transmission housing, which, if properly installed, should be at least 21.1 mm.
3. Install pins (if they were removed).
4. Carefully install the transmission on the engine along the guide pins and tighten the bolts to the specified torque.
5. Remove the strip securing the torque converter, align the torque converter holes with the holes in the drive plate and tighten the mounting bolts.
6. Tighten the torque converter bolts to the specified torque, install the sump cover, tighten the bolts.
7. Install starter.
8. Position the power unit under the vehicle and attach the hoist hoist.
9. Working with an assistant, carefully drive the power unit into the engine compartment.
10. Install the rubber cushions on the bracket of the left support of the power unit, making sure that the studs of the cushions fit into the holes of the bracket. Reinstall the support, wrap the bolts securing the support to the transmission and tighten them to the specified torque. Insert the pinch bolt and hand tighten the nut.
11. Install the rubber pads to the right suspension bracket from the body side, making sure that the pad studs fit into the holes in the bracket. Install the support on the bracket and tighten the bolts to the specified torque. Insert the pinch bolt and hand tighten the nut.
12. Insert the rear support pinch bolt and hand-tighten the nut.
13. Install the side member, tighten the bolts to the specified torque.
14. Install the front support bracket and tighten the bolts. Insert the pinch bolt and hand tighten the nut. Align the engine so that the pinch bolt marks made during disassembly line up and tighten the nut.
15. Rock the power unit and tighten the pinch bolts of the remaining supports.
16. Further, the installation of the power unit is carried out in the reverse order.
17. Make sure the wiring is routed and secured with clips and braces, and that all connectors are connected.
18. Replace the axle shaft seals and install the axle shafts.
19. Connect all hoses of the cooling system.
20. Adjust throttle cable (see subsection 6.1.7).
21. Attach and adjust gear selector and kick-down cables.
22. Install and adjust drive belts.
23. Change the oil in the engine and gearbox.
24. Fill with coolant.
25. Start the engine and check for leaks.